Free CAT4 Level C-D Sample Questions, Answers & Preparation Guide
I’m Liron Katz, education expert and creator of this comprehensive prep pack. Schools heavily rely on CAT4 Level C and D scores for KS2/KS3 placement and private school entrance exams, but you don't have to leave their results to chance. Give your child the ultimate advantage with free, structured home practice covering all eight question types, plus my expert scoring insights.
Use the links below to explore CAT4 Level C-D practice questions, preparation tips, score information, and resources:
Free Practice Questions | CAT4 Level C-D Tips | Why Level C- D Matters | Understanding the Report | Enrichment Pack | Learning Recommendations | Achievement Indicators | Prep Pack | FAQs
Free CAT4 Level C-D Sample Questions
This section introduces one sample question for each reasoning skill across all four CAT4 batteries. These examples reflect the question styles commonly found in Levels C and D and help students become familiar with the reasoning skills assessed. Each sample question includes an explanation to show how successful students approach the task.
Verbal Reasoning Battery
This battery contains two question types: Verbal Analogies and Verbal Classification
In Verbal Analogies, students identify the relationship between a pair of words and apply that same relationship to a new pair. A helpful strategy is to form a sentence that explains how the words are connected.
Lets take a look of the following analogy:
In Verbal Classification, students identify the word that shares a common category or defining feature with a group of related words.
Let’s try one together:
Quantitative Reasoning Battery
This battery includes two question types: Number Series and Number Analogies
The following example is a Number Series question. Number Series questions provide a series of numbers with a certain pattern or rule. You need to determine the pattern and use the rule to determine which number will come next in the series.
Let’s try one together:
In Number Analogies, students identify the relationship between pairs of numbers and apply that same relationship to complete a new pair. Let’s try one together:
Non-Verbal Reasoning Battery
This battery consists of two question types: Figure Matrices and Figure Classification
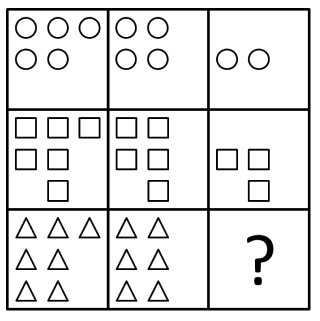
The following example is a Figure Matrix question.
In Figure Matrices, students complete a 2x2 or 3x3 grid by finding the image that follows the same visual rule across rows and columns.
Let’s try one together:
Figure Matrix Question
Add the Figure Matrices Enrichment Pack
Want more CAT4 Non-Verbal Reasoning practice? Add our Figure Matrices Enrichment Pack to your cart for focused training on one of the most important CAT4 question types.
The pack includes more than 200 Figure Matrices questions across three levels:
- Elementary to Intermediate: 43 questions
- Intermediate to Advanced: 45 questions
- Extended Practice: 115 additional questions at mainly intermediate difficulty
Each section is designed to strengthen pattern recognition, visual analysis, and logical reasoning skills through targeted practice and detailed answer explanations.
Add it to your cart today to extend your CAT4 preparation with a comprehensive collection of Figure Matrices questions suitable for a wide range of ability levels.
In Figure Classification, students identify the image that shares a common feature or relationship with a given set of images. Let’s try one together:
Figure Classification Question

Spatial Ability Reasoning Battery
This battery includes two question types: Figure Analysis and Figure Recognition
The following example is a Figure Analysis question. Figure Analysis questions show a paper folded several times and then punched with holes. The answer choices contain unfolded papers with punched-in holes. Students need to determine which of the answer choices is the final product of the unfolded punched-in paper.
Figure Analysis Question

In Figure Recognition, students identify the option that contains the given shape in the same size and orientation. Let’s try one together:
Figure Recognition Question
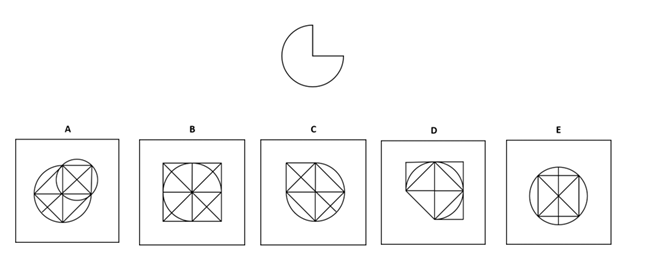
The shape you need to identify is shown at the top of the image. Your task is to find the answer choice (A, B, C, D, or E) that contains the exact same shape, maintaining its size and orientation.
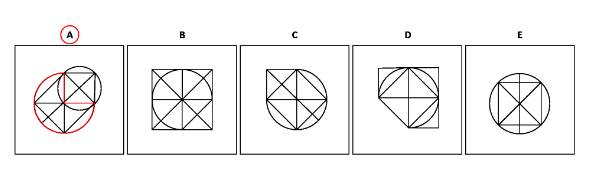
The correct answer is A.
Let's Break This Down Step by Step
First, let's take a close look at the shape we need to find. At the top of the image, we see a pie chart shape that looks like a circle with about one quarter (1/4) of it missing, creating what looks like a "Pac-Man" mouth opening to the right. This is our target shape, and we need to find the answer choice that contains this exact same shape with the same size and orientation.

This is a Figure Recognition question, which means we need to locate the target shape hidden somewhere within the answer choices. The key word here is "exact" - the shape must maintain its size and orientation perfectly. It can't be rotated, flipped, resized, or changed in any way. Think of it like finding a specific puzzle piece that fits perfectly without any modifications.
Answer Choice A
Looking at answer choice A, we can see a circular shape with internal line divisions creating a pattern. Most importantly, when we look carefully at this figure, we can identify our target pie chart shape within it! The shape appears in the correct size and orientation, with the "mouth" opening to the right, just like our target shape. The circular outline and the quarter segment missing match perfectly.
Answer Choice B
Answer choice B shows a square shape divided into triangular sections by diagonal and perpendicular lines. Since our target shape is circular (a pie chart), and this answer choice is based on a square, we can confidently eliminate B. The fundamental shape is different, so our circular pie chart cannot be found here.
Answer Choice C
Answer choice C contains a circular shape, which is promising! However, when we look more carefully, the internal structure and orientation don't match our target. While it has a circular base, the way the segments are arranged and the direction of any "mouth" or opening doesn't align with our target shape's orientation. Close, but not quite right!
Answer Choice D
Answer choice D shows a shape that's more rectangular or square-based with diagonal lines and what appears to be a triangular cutout or segment. Our target shape has a circular base with a rounded "mouth" opening, not a triangular one. The overall geometry is different, so we can eliminate D as well.
Answer Choice E
Answer choice E displays a full circle with internal divisions creating a symmetrical pattern. While it is circular like our target shape, it's missing the key feature we need - that quarter segment cutout that creates the "mouth" opening. It's a complete circle, whereas our target is missing approximately one quarter of the circle. This doesn't match, so E is not correct.
Confirm the Correct Answer
Going back to answer choice A, we can now confidently confirm that it's the right answer! It's the only choice that contains our exact target shape - a circular pie chart with about three quarters of the circle present and one quarter missing, creating that distinctive "mouth" opening to the right. The size matches, the orientation matches, and all the details line up perfectly. Answer A contains our shape exactly as required, making it the correct answer!
Master CAT4 Levels C-D. Practise. Improve. Succeed.
CAT4 Level C-D Tips from Liron
Here are practical, student-friendly strategies for each CAT4 Level C-D question type.
Why CAT4 Levels C-D Matter
CAT4 Levels C and D are often administered during an important educational transition. Level C is frequently used during Year 6, when students may be preparing for secondary school entrance assessments and admissions decisions. Level D is commonly used in Year 7 to help schools understand how students are adapting to secondary education.
Schools use CAT4 Levels C-D to:
- Identify reasoning strengths and areas for development
- Support admissions and placement decisions
- Establish a baseline for future academic progress
- Identify students who may benefit from additional support or greater academic challenge
- Help teachers tailor learning approaches to individual students
What Is on Your Child’s CAT4 Level C-D Report
The CAT4 score report breaks down a child’s cognitive "toolkit" into four distinct areas, known as batteries. Understanding these helps parents see the "why" behind their child’s grades.
- Verbal Reasoning: The ability to understand ideas through words. This is essential for subjects like English, History, and Drama.
- Non-Verbal Reasoning: Solving problems using visual patterns and shapes. This indicates a child’s ability to think logically without needing language.
- Quantitative Reasoning: The ability to play with numbers and identify numerical relationships—the backbone of Mathematics and Economics.
- Spatial Ability: Visualizing 3D objects and rotating them in the mind. This is a massive indicator of success in STEM, Architecture, and Design & Technology.
- The Learning Profile: The report combines these scores to determine if a child has a "Verbal Bias," a "Spatial Bias," or a "Balanced Profile."
Learning Recommendations in the CAT4 Report
The CAT4 report includes practical recommendations designed to help parents and teachers support each student's learning profile.
These recommendations may include:
- Preferred learning approaches, such as visual, verbal, or structured methods
- Teaching strategies that align with a student's strengths
- Revision and study techniques that support long-term success
- Suggestions for building confidence in weaker reasoning areas
By understanding how a student processes information, schools and families can provide more effective support both in and out of the classroom.
Achievement Indicators: What CAT4 Level C-D Scores Can Tell Us
The CAT4 report includes Indicators of Achievement, which compare a student's reasoning profile with the performance of students who achieved similar CAT4 results in the past.
These indicators may include:
- The Most Likely Grade, representing the outcome most commonly achieved by similar students
- The If Challenged Grade, representing a higher target that may be achievable with strong effort and effective support
These indicators are intended to guide academic planning and target setting. Many factors, including motivation, teaching quality, study habits, and confidence, also influence future outcomes.
Preparing Your Child for CAT4 Level C-D Success with Our Test Prep Pack
Helping your child prepare for CAT4 Levels C or D does not have to be stressful. Although CAT4 measures reasoning ability rather than school knowledge, familiarity with the question formats can improve confidence, reduce uncertainty, and help students demonstrate their true potential.
The TestPrep Online CAT4 Level C-D Preparation Pack includes:
- 530+ practice questions across quizzes and full-length tests
- One CAT4 Study Guide covering every question type
- One Score Guide to help track progress
- Unlimited retakes
- Six months of access
Give your child the opportunity to approach school assessments feeling prepared, confident, and ready to succeed.
Give Your Child the Tools to Walk Into School Assessments Feeling Calm, Confident, and Ready to Succeed.
Ask Liron

A language and linguistics expert with an MA in Language Teaching and over a decade of experience developing assessment-aligned practice across multiple subjects that mirrors the rigor of real edtech tests. Liron creates prep packs with clear, structured exercises that enhance learning, adapt to digital tools, and empower every student to perform their best on a wide range of assessments
CAT4 Level C-D FAQs
CAT4 Level C is designed for students aged 9 years 6 months to 11 years 11 months and is commonly used in Year 6. CAT4 Level D is designed for students aged 10 years 6 months to 12 years 11 months and is typically used in Year 7. Together, these levels support secondary school admissions, placement, and learning assessment.
The pack includes 500+ questions, full tests, study and score guides, unlimited retakes, and 6 months of access.
Absolutely. Practice builds confidence, improves pacing, and helps students feel in control on test day.
Most families see strong results with 15–25 minutes a day over 2–3 months, making it easy to fit into busy school schedules.
Yes. Strong students benefit by learning how to approach unfamiliar question types efficiently and accurately.
The free questions provide a taste. The Prep Pack offers full coverage, deeper explanations, complete tests, and structured progression.
Practice does not change a student's underlying reasoning ability. However, becoming familiar with CAT4 question types can improve confidence, reduce avoidable mistakes, increase efficiency, and help students perform closer to their full potential.


